Creating a Project
In ZooMonitor Admin on the Behavioral Observation project list page, click Create to start a new project. When creating a project, you will need to do the following steps:
- 1. Specify Project Settings
- 2. Add Focal Subjects
- 3. Create an All Occurrence Channel (as needed)
- 4. Create Continuous Channels (as needed)
- 5. Create Interval Channels (as needed)
- 6. Adding Behaviors to All Occurrence, Continuous, and Interval Channels
- 7. Create Additional Questions (as needed)
- 8. Add Observers
To demonstrate the different project settings in this support guide tutorial, the following screenshots display the Crowned Lemur (example project) settings.
Specifying a Project
When creating a new project, you will first need to specify a Name and Study Duration for the project, click the Active checkbox, and click Save to get started. This creates the project and unlocks the other project tabs to specify details for your project. After you the project has been created, you can then click the project name in the Behavioral Observation project list to edit the project and finish creating the project.
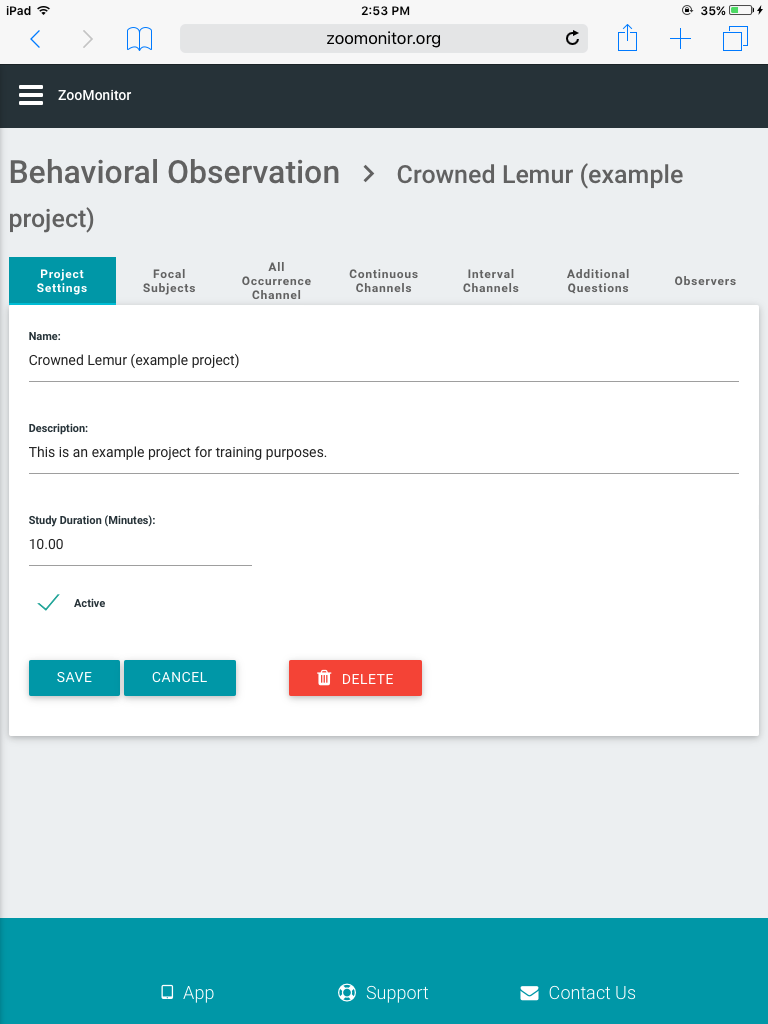
The Project Settings tab provides an overview of general project specifications.
Add Focal Subjects
After creating the project, you will first need to add Focal Subjects (Note: You must first create that animal when configuring ZooMonitor. See Add Animals for more details.). To add a subject, click the open text box that says “Select to add…” and enter the animals name. Click the Plus icon to add the subject. If you need to remove a subject, you can click the X icon under Actions (Note: Removing a subject will prevent observers from recording new observations on that animal in the app, but previously recorded data for that animal will still be available in the raw data export).
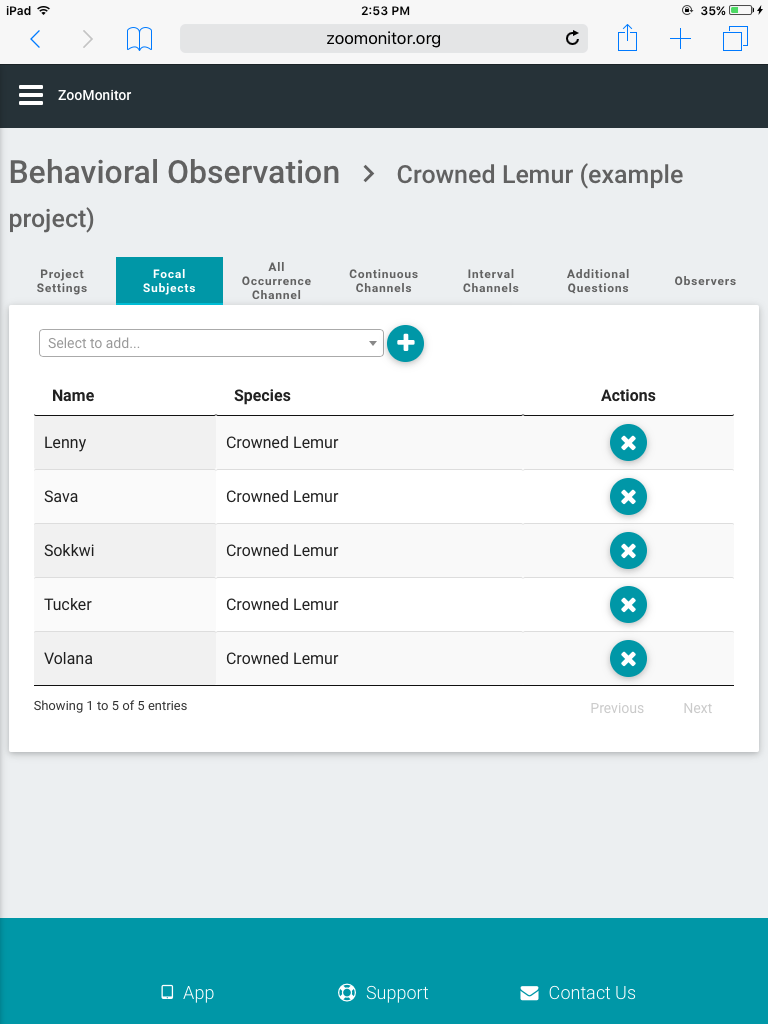
The Focal Subjects tab allows you to add animals to your project.
Create an All Occurrence Channel (as needed)
If you wish to add all-occurrence behaviors to your project, toggle the Include All Occurrence Behaviors slider to On (Note: As you can record any number different all-occurrence behaviors in a single channel, you can only create one channel for this sampling method). After doing this, you will then be able to select Add to create new all-occurrence behaviors. Also, you can rearrange the order of the behaviors using the plus icon to the left of the behavior name.

The All Occurrence Channel tab allows you to create all-occurrence behaviors to record in your project.
Create Continuous Channels (as needed)
To include continuous behaviors in your project, you need to click Add Channel to create a new Continuous channel. When you add a new channel, you will only need to specify the channel name. After the channel has been created, you can click the channel name in blue or the pencil icon to view the Continuous channel. Click Add to create a new continuous behavior. You can rearrange the order of the Continuous channels or the behaviors within a channel using the plus icon on the left of the screen to drag and drop the channel or behavior in your desired order.
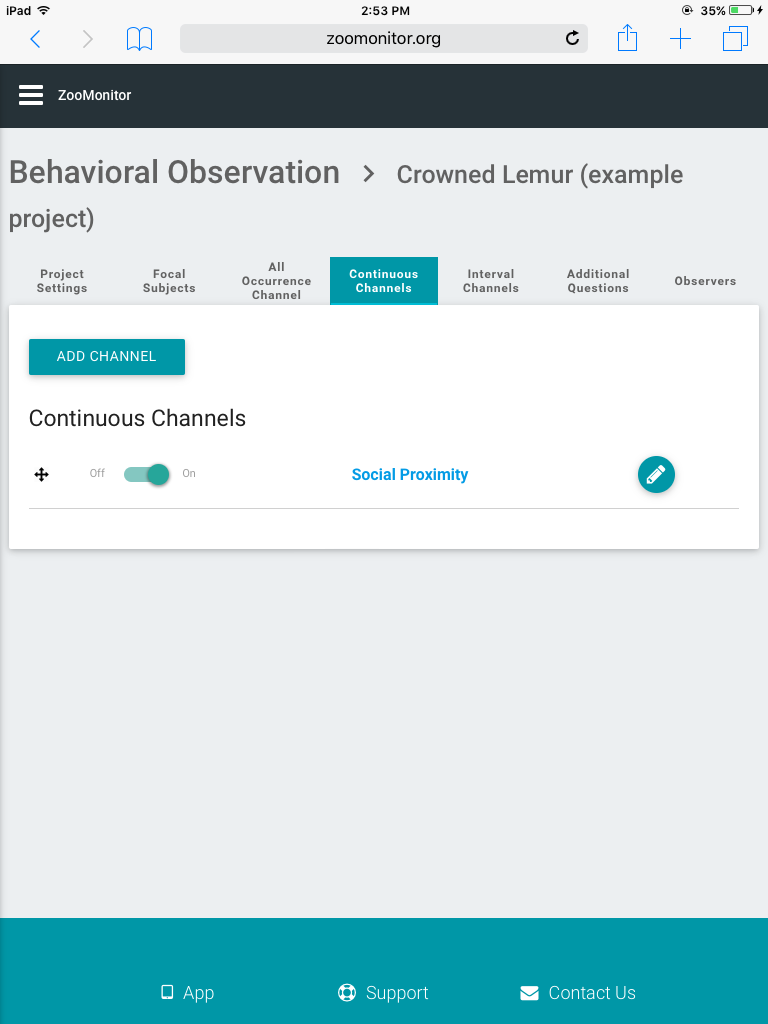
The Continuous Channels tab allows you to create continuous channels and add behaviors to those channels to record in your project.
Create Interval Channels (as needed)
To include interval behaviors in your project, you should first include the number of intervals in the Interval Count field and then click Save (Note: You only need to click save when changing the number of intervals, all other changes are automatically updated). After this, you need to click Add Channel to create a new Interval Behavior channel. When you add a new channel, you will only need to specify the channel name. After the channel has been created, you can click the channel name in blue or the pencil icon to view the Interval Behavior channel. When viewing the Interval Behavior channel you created, click Add to create a new interval behavior. You can rearrange the order of the Interval Behavior channels or the behaviors within a channel using the plus icon on the left of the screen to drag and drop the channel or behavior in your desired order.
To add a Space Use channel, toggle the Space Use Channel slider to On. The Space Use channel allows you to record the location of an animal on a map image. Once the Space Use channel is turned on, click the Space Use button to specify settings.
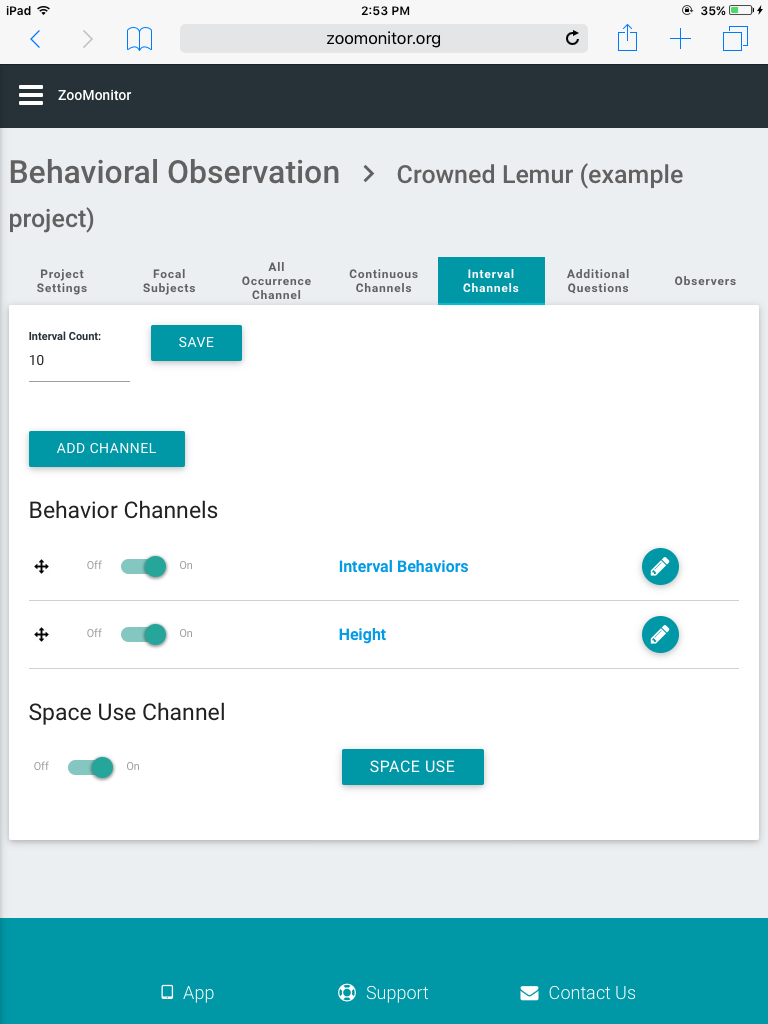
The Interval Channels tab allows you to create interval channels and add behaviors and a space use map to record in your project.
In the Space Use channel, you can specify the map image by clicking the Upload File button and navigating to the file on your hard drive (Note: ZooMonitor allows images to be in .jpg and .png formats and should have minimum dimensions of 600 x 600 pixels. Larger images will be scaled down to fit). You can optionally overlay a grid on the map image by toggling the Enable Grid slider to On, specifying grid dimensions in the Number of Grid Columns and Number of Grid Rows fields, and clicking Save (Note: Any changes to the Space Use channel must be saved). After saving the grid settings, you can preview the grid settings by clicking Preview Grid Image. You can also record space use data on the map image with the grid overlay turned off (Note: When the grid overlay is turned on, ZooMonitor will record both the screen XY pixel coordinates and the grid coordinates. When the gird overlay is turned off, ZooMonitor will only record the XY pixel coordinates). To return to the main Interval Channel tab, click Interval Channels in the top left of the tab header.
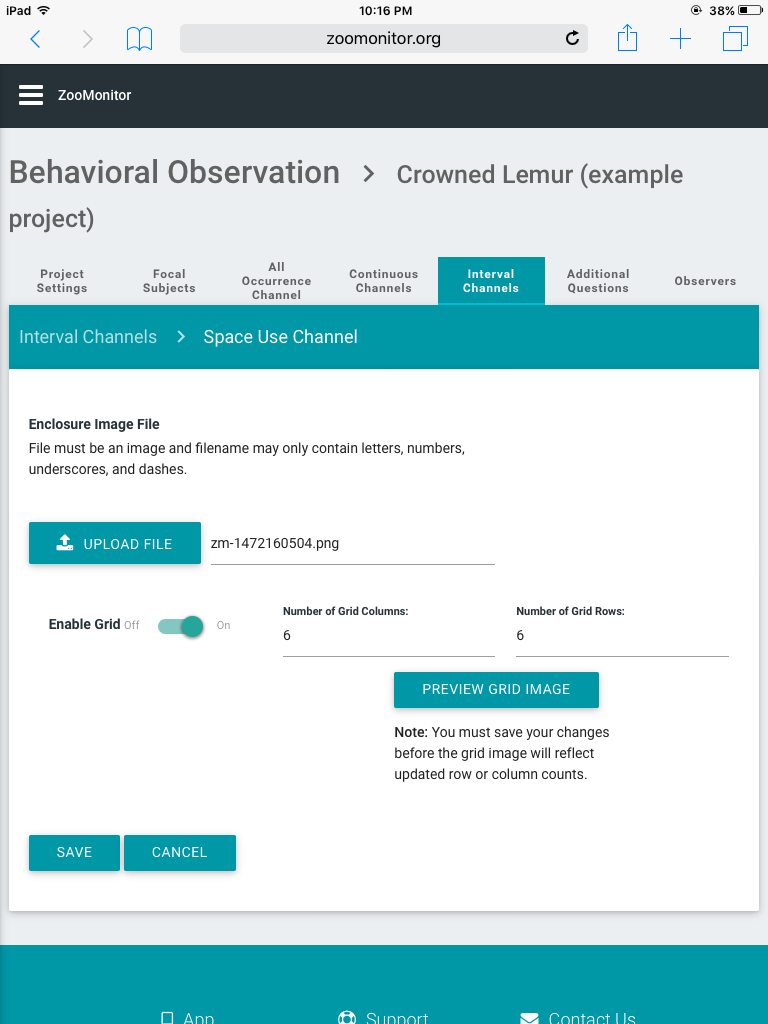
The Space Use channel screen allows you to upload a map image and specify an optional grid overlay on the image.
Adding Behaviors to All Occurrence, Continuous, and Interval Channels
When adding a new behavior, you will see the Behavior Details pop-up window. These choices are the same when creating all-occurrence, continuous, and interval behaviors. After specifying all of the behavior details, click Save (Note: you must click Save anytime you edit the behavior and make a change).
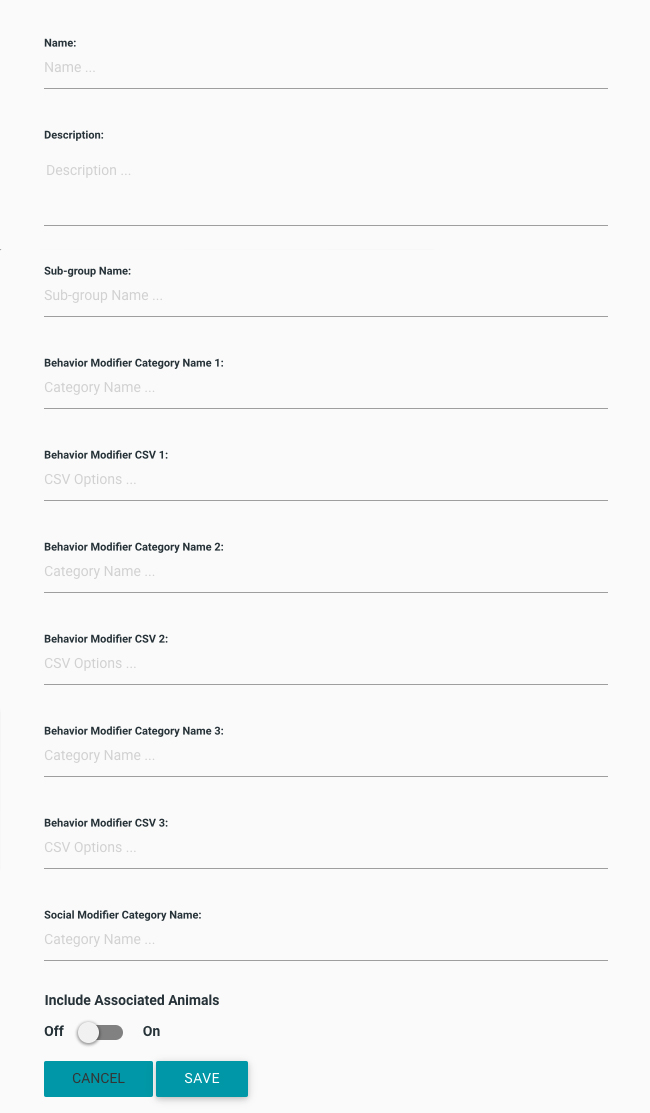
The Behavior Details window specifies the settings for a behavior.
Name (required) - The behavior name.
Description (optional) - A text description or definition of the behavior that can be viewed when recording data.
Sub-group Name (optional) - The name of a sub-group and used to group similar behaviors within a channel (e.g. solitary and social subgroups). On the data recording screen in the app these will appear on separate rows within a channel.
Behavior Modifier Category Name (optional) - A name describing the type of behavior modifiers. Behavior Modifiers are used to record additional details of a behavior. For example, you could specify rest and alert as behavior modifiers to an inactive behavior or initiator and recipient as modifiers to a social behavior. You can specify up to three behavior modifier categories. When you click a behavior with a modifier, a pop-up window appears that lists the available modifier choices.
Behavior Modifier CSV (optional) - A list of behavior modifiers specified as comma-separated-values (e.g. Alert,Rest).
Social Modifier Category Name (optional) - A name describing the social modifier categories (e.g. Social Partner).
Include Associated Animals (optional) - A slider bar to toggle on recording of social modifiers. Social modifiers allow you to specify another animal in the project list besides the focal animal.
Create Additional Questions (as needed)
To record independent variables at the start of your observation, you can specify Additional Questions by clicking the Create button. ZooMonitor allows three types of additional questions: List, Text, and Number. List questions allow you to create a drop-down list of values to record before the observation. Text questions allow you to enter any string of text or numbers. Number questions allow you to enter whole numbers.
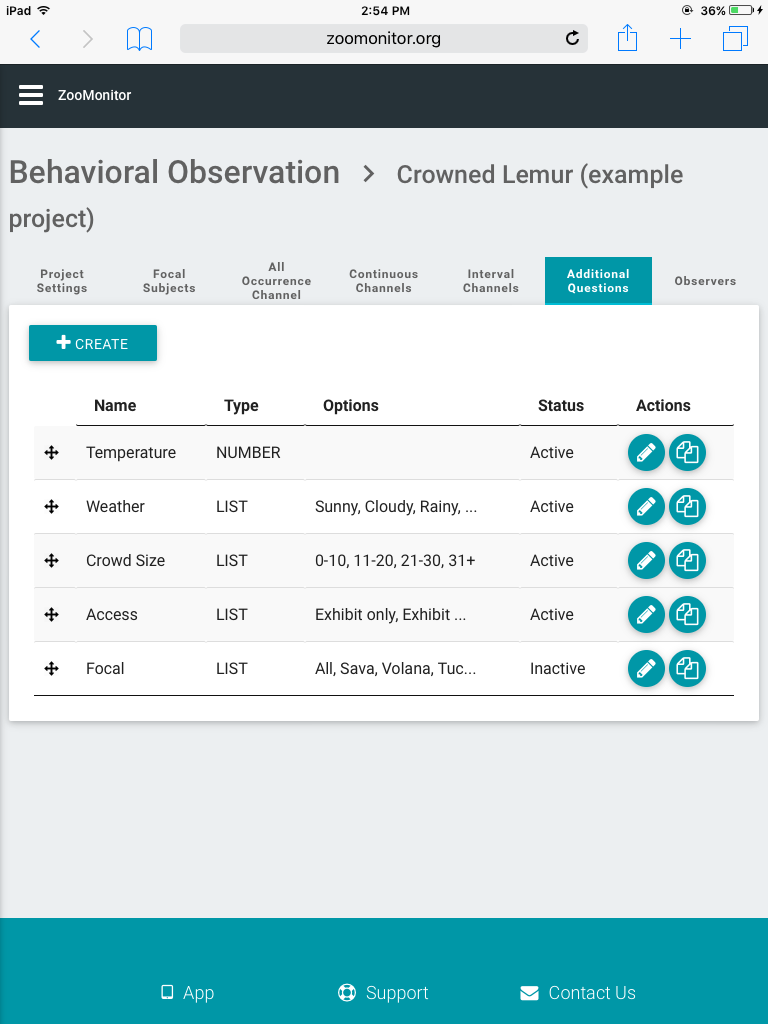
The Additional Questions tab allows you to create fields to record independent variables before the start of an observation.
Add Observers
You must add Observers to your project to allow them to view the project in the app and conduct observations (Note: You must first create the Observer when configuring ZooMonitor. See Add Observers for more details). To add Observers, you need to select the text bar and scroll down or search for the user’s name (Note: You cannot add Admin Users, they must have a separate Observer profile created to be added to projects). Click the Plus icon to add the Observer. If you need to remove an Observer, you can click the X icon under Actions (Note: Removing an Observer will prevent this project from appearing in their project list in the app, but previously recorded data for that Observer will still be available in the raw data export).
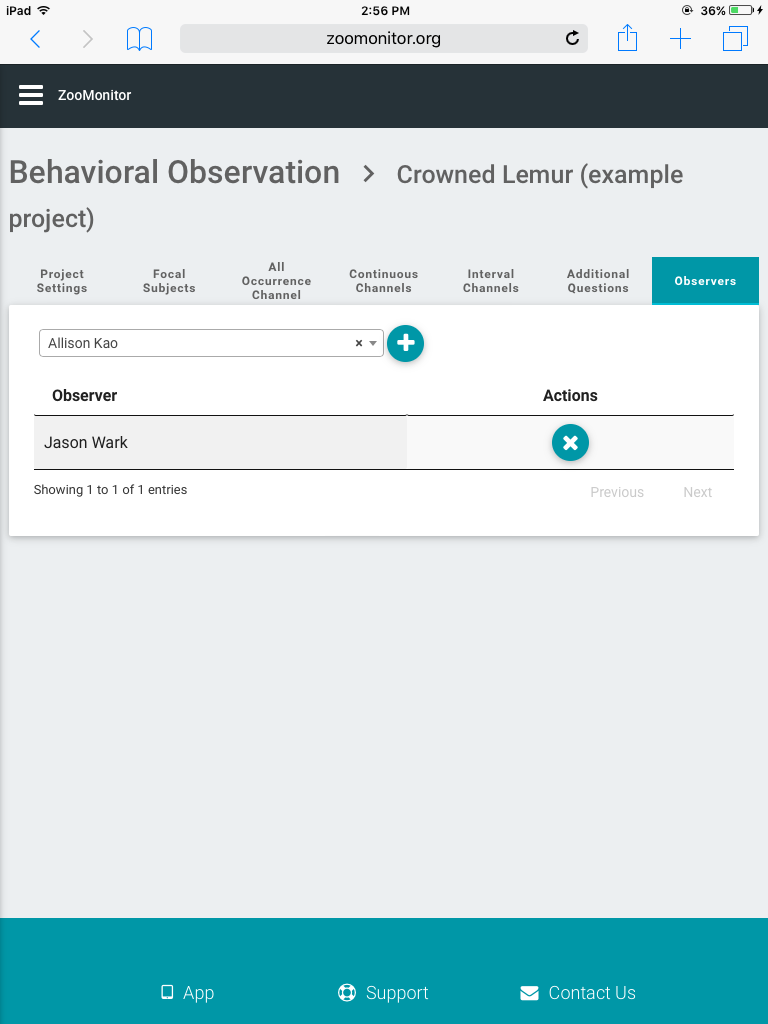
The Observers tab allows you to add users to view the project in the app and record data.